Installation of ISO-PROTECT Site Hoarding System
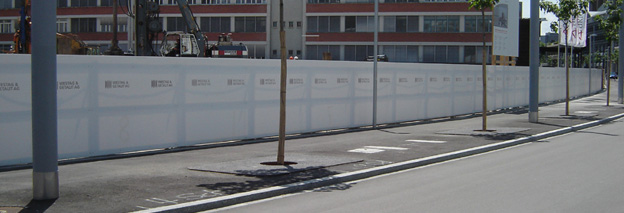
ISO-PROTECT hoarding: example of installation
Wherever your jobsite may be, on meadows, plowed farmland, sand, gravel, concrete, crushed rock or asphalt, ISO-PROTECT jobsite walls are ideally adaptable to all ground conditions and can be easily and quickly installed.
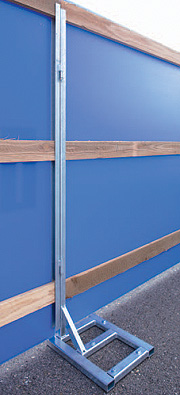
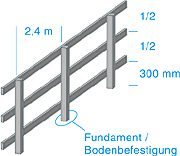
Step 1: The Support Frame
When installing ISO-PROTECT over nonpaved subsurfaces, use wooden posts 120 mm x 160 mm to anchor the hoarding wall system (against strong winds, rain, etc.). Drive the posts into the nonpaved subsurface at intervals of 2.4 m. Then screw 30 mm thick planking onto the posts at three different heights, providing a continuous support frame for the hoarding panels. We recommend installing the lowest planking row with a clearance of 300 mm above ground level. The upper edge of the highest planking row should be even with the upper edge of the ISO-PROTECT panels.

ISO-PROTECT panels are normally installed with a gap of 5 to 10 mm between adjacent panels to allow for thermal expansion. The panels can also be installed in an overlap configuration with 50 mm overlap at the joint.
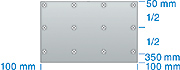
Mounting of the panels on the support frame is best done using stainless-steel button head screws at least 45 mm in length and washers at least 26 mm in diameter. In some (outdoor) applications use of a ring seal is recommended with the washer. The required screw spacing depends on the forces and wind speeds expected at the site. Please refer to the table below.
| Requirements | Wind speed | Screws | Screw type | Foundation |
| Normal | up to 100 km/h | 12 screws (3 x 4) | 4.5 mm x 45 mm with seal and 26 mm finishing washer |
Strong anchoring and stable subsurface required |
| Heavy-duty | up to 135 km/h | 15 screws (3 x 5) | " | " |
